Author Topic: 1860 Richards Model 1 conversion update  (Read 7942 times)

Offline Ottawa Creek Bill

  • Vietnam Vet 1966,67 First place, Southeast Asia Rifle Team, "66/67"
  • Top Active Citizen
  • *
  • Posts: 1970
  • OCB, A Newer, More Gentler NCOWS Member...........
  • Liked:
  • Likes Given: 0
1860 Richards Model 1 conversion update
« on: September 28, 2006, 02:26:41 PM »
I had a couple of fellas ask me to post this so here it is:

Here is how far along I am on the Richards Model 1, I would have had it done by now except that I had a couple of other conversions to do and build a new Hope Saddle.

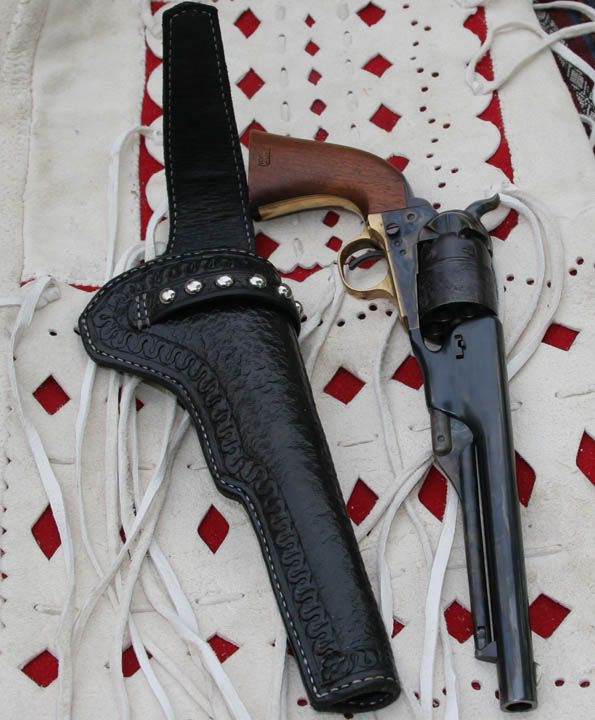
The frame on this gun is a Uberti frame and the barrel is an old style Army San Marco. What I like about this particular barrel is that it has old style round bottom rifling in it. The blue on the barrel is Dykem layout ink. I have the proper radiusis scribed in and I'm going to work on those this week. As most of you know, original percussion barrels had a lot more radiusis and contours then the reproductions made today, they were a lot more graceful looking.

The discoloration in the ejector rod assembly is where I've welded the tube to the other components and have not polished it as yet.

Any questions, feel free to ask.

Oh yea, the threads coming out ot the rear of the frame is from a new cylinder arbor that I made. The ones that they put in the guns today are cast.

When this project is complete, I going to have this nickle plated and put ivory grips on it.....

Bill
IF YOU RIGHT CLICK YOUR MOUSE BUTTON AND THEN HIT ENTER, IT WILL ENLARGE THE IMAGE A LITTLE.


Vice Chairman American Indian Council of Indianapolis
Vice Chairman Inter tribal Council of Indiana
Member, Ottawa-Chippewa Band of Indians of Michigan
SASS # 2434
NCOWS # 2140
CMSA # 3119
NRA LIFER


Offline Black River Smith

  • Top Active Citizen
  • *
  • Posts: 1188
  • Liked:
  • Likes Given: 46
Re: 1860 Richards Model 1 conversion update
« Reply #1 on: September 28, 2006, 04:20:12 PM »
Did you recut the arbor threads?  If Yes what did you cut to?  I measured them at 5/16 x 36.  If I could recut to 5/16 X ? and then make a new arbor pin, the overall problem of timing the original arbor to the new plate would be easier.  I would take my chances recutting new wedge slot, one or two times, rather than messing up the original pin. 
Black River Smith

Offline gw

  • NCOWS Member
  • Top Active Citizen
  • ***
  • Posts: 541
  • Liked:
  • Likes Given: 0
Re: 1860 Richards Model 1 conversion update
« Reply #2 on: September 28, 2006, 06:24:51 PM »
Nice work Bill! I'm looking forward to seeing it when it's completed, I'd guess you are too ;D
NCOWS 1437-Territorial Representative  -Great Lakes Freight and Mining Co.- NCOWS Representative and Delegate to the Executive Board
SASS 5847 Life
NMLRA
NRA Life
MIAMI RIFLE CLUB Life
QUIGLEY SHOOTER Lifer

Advertising

  • Guest
Re: 1860 Richards Model 1 conversion update
« Reply #3 on: Today at 11:28:39 PM »

Offline Ottawa Creek Bill

  • Vietnam Vet 1966,67 First place, Southeast Asia Rifle Team, "66/67"
  • Top Active Citizen
  • *
  • Posts: 1970
  • OCB, A Newer, More Gentler NCOWS Member...........
  • Liked:
  • Likes Given: 0
Re: 1860 Richards Model 1 conversion update
« Reply #3 on: September 28, 2006, 07:30:19 PM »
Black River Smith,
Jerry, The threads on all these 1860 frames are 5/16 X 18. I've had a 1/2 dozen or so apart and they all were 5/16 x 18. 

Even though the cylinder arbor in the photo is a new one I made, I learned a little trick if you break the original one trying to get it out.

All you have to do is turn the borken end down true on a lathe, drill a hole with a F drill using the tail stock of the lathe, and then tap it 5/16 x 18. Silver solder a 5/16 x 18 threaded bolt into the newly threaded hole into the old arbor and silver solder it in place.

Brownell's sells a brazing paste that has to be heated to 1250 degrees that I use, its expensive but really convenient as far as application.

After its cooled, cut to the threaded emd to appropriate size and dress the threads (clean up). This saves making a new one, and you don't have to throw the old one away so it saves having to mill out a slot for the barrel wedge.

GW,
Steve, I was hoping to have it ready for the Eastern Regional, but contouring the radius's on the barrel is going to take some time.

Bill
Vice Chairman American Indian Council of Indianapolis
Vice Chairman Inter tribal Council of Indiana
Member, Ottawa-Chippewa Band of Indians of Michigan
SASS # 2434
NCOWS # 2140
CMSA # 3119
NRA LIFER


Offline Lone Gunman

  • CAS-L Ghost Rider
  • Top Active Citizen
  • *
  • Posts: 1501
  • The Lone Gunman ...as himself
    • Lone-Gunman.com
  • Liked:
  • Likes Given: 0
Re: 1860 Richards Model 1 conversion update
« Reply #4 on: September 28, 2006, 08:39:22 PM »
Brownell's sells a brazing paste that has to be heated to 1250 degrees that I use, its expensive but really convenient as far as application.

Bill, is that the STL 1260 or the non-flowing? It is a might pricey  :o    Would it be strong enough to repair an arbor that broke right at the wedge slot?


BTW, nice work...the ejector housing looks like a nightmare to create, the pictures in McDowell's look like that would take an awful lot of hand filing.
George "Lone Gunman" Warnick

"...A man of notoriously vicious & intemperate disposition"

Offline Bristow Kid

  • I've got a touch of hangover beuracrate. Don't push me
  • Top Active Citizen
  • *
  • Posts: 724
  • Matthew(Matt) Bohach
  • Liked:
  • Likes Given: 0
Re: 1860 Richards Model 1 conversion update
« Reply #5 on: September 28, 2006, 08:45:45 PM »
Looks cool Bill you do great work.
Prayer Posse
SCORRS
NCOWS #2540
Grand Army of the Frontier #437
Department of the Missouri
PWDFR #149
RATS #233
SASS #68717
WARTHOG

Offline Ottawa Creek Bill

  • Vietnam Vet 1966,67 First place, Southeast Asia Rifle Team, "66/67"
  • Top Active Citizen
  • *
  • Posts: 1970
  • OCB, A Newer, More Gentler NCOWS Member...........
  • Liked:
  • Likes Given: 0
Re: 1860 Richards Model 1 conversion update
« Reply #6 on: September 28, 2006, 09:37:26 PM »
LG,
Yes, its the STL-1260. I've never tried it on anything completely broken off. If I were you I would just fit a new arbor to the gun. There is no filing on the ejector rod housing, its all mill work.

On the original Richards, the ejector rod housing and components were milled out of one piece of solid stock. In the ones that I make there are four pieces that have to be fitted and welded together. Some day when I get the time, I'm gonna figure out how to do it out of one piece of stock.

Bill

Vice Chairman American Indian Council of Indianapolis
Vice Chairman Inter tribal Council of Indiana
Member, Ottawa-Chippewa Band of Indians of Michigan
SASS # 2434
NCOWS # 2140
CMSA # 3119
NRA LIFER


Offline Black River Smith

  • Top Active Citizen
  • *
  • Posts: 1188
  • Liked:
  • Likes Given: 46
Re: 1860 Richards Model 1 conversion update
« Reply #7 on: September 28, 2006, 10:59:48 PM »
Well Bill, it appears I am the unfortunate one to have a 5/16 X 36.  I checked and now rechecked, it measures out a 36.  But knowing that you have several at 18 which is a common tap and one that I have, I now won't worry about an OOps.  I will just recut to 18 or 24 and make a new arbor if need be.

LG, for the originals the ejector housing was considered to be the most costly part.  Basing on overall time involved to make it look right and make it work I would agree.  There are 8 parts to my housing.  Angle iron for filler and tube base; solid rod for ram filler; pins holding rod to angle iron; solid rod hollowed for tube; retaining screw through ram area for holding housing in place; ejector rod; ejector spring and ejector head.  Now fitting all parts is another matter.

All for fun.  But so was cutting new ratchets without an indexer. :o  But the new hand and cylinder are timed and work, just not fast or reaaal smooth.

PS:  Bill you are total correct about the barrel contour lines but I can't go that far.  I will live with what the revovler has.

One other question, mine has brass backstraps.  Any suggestion to compensate for this flaw?  Besides nickelling that is.
Black River Smith

Offline will52100

  • Top Active Citizen
  • *
  • Posts: 850
    • Custom Knives
  • Liked:
  • Likes Given: 3
Re: 1860 Richards Model 1 conversion update
« Reply #8 on: September 28, 2006, 11:29:45 PM »
Looking good!  Can't wait to see it finished.

What are your thoughts on using a Richard's Mason cylinder from VTI for a Richards type 1?  That's the only part I'm not realy comfortable making.  Acourding to Cimmeron there RM parts will interchange with originals, and by that token should work with a Uberti revolver.  I mean the 44 colt chambering.  Would reline the barrel to use modern 44 colt also.

Thanks for sharing the pics
Buzzards gotta eat, same as worms

Offline Ottawa Creek Bill

  • Vietnam Vet 1966,67 First place, Southeast Asia Rifle Team, "66/67"
  • Top Active Citizen
  • *
  • Posts: 1970
  • OCB, A Newer, More Gentler NCOWS Member...........
  • Liked:
  • Likes Given: 0
Re: 1860 Richards Model 1 conversion update
« Reply #9 on: September 29, 2006, 08:01:53 AM »
Quote
One other question, mine has brass backstraps.  Any suggestion to compensate for this flaw?  Besides nickelling that is.
Jerry,
I think some of the original richards had brass backstraps, I actually like that look on the richards.

 
Quote
What are your thoughts on using a Richard's Mason cylinder from VTI for a Richards type 1?

will52100,
AS long as the radius from the center of the arbor hole in the cylinder and the center of the chamber mouth, match the center of the arbor hole and forcing cone of the barrel you're OK. The easiest way to measure this is with a set of center buttons.

I made a simple gauge made of 1/8th inch thick 4140 steel, measured the proper radius, turned down two pieces of tool steel, one to match the arbor and one to match the mouth of the chamber, drilled the proper holes and silver solderd them in place. This gives me an instant check of both the barrel and cylinder radii.

I think the VTI Uberti cylinders are a good deal (less then a $100.00). They are made a little oversized so you may have to relieve the rebate in the frame to make them fit properly if you are using a modern percussion revolver as the basis for your conversion.

If you reline the bore of your barrel, you're gonna ruin the authenticity of your hard work, even though hollow base bullets are not 100% correct for the time period of these revolvers (modern hollow bases), it saves you the hassle of not altering the orignal configuration of these period revolvers, then there are heeled bullets too, your choice.

Bill
Vice Chairman American Indian Council of Indianapolis
Vice Chairman Inter tribal Council of Indiana
Member, Ottawa-Chippewa Band of Indians of Michigan
SASS # 2434
NCOWS # 2140
CMSA # 3119
NRA LIFER


Offline will52100

  • Top Active Citizen
  • *
  • Posts: 850
    • Custom Knives
  • Liked:
  • Likes Given: 3
Re: 1860 Richards Model 1 conversion update
« Reply #10 on: September 29, 2006, 10:46:29 AM »
Thanks, if it's a little over size that's no problem to relieve just a bit.  The reason I would like to line the bore is conveience, I've got big lub 6 cavity mould in .429.  From experiances with a 51' conversion casting one hollow base at a time is SLOW.  Realy cuts into my shooting time.  I like authenticity, but I can live with a slightly more modern bore size.  And I plan on this beeing a shooter, probably a main match gun.

Just out of curiosity, how did you mill the grove in the side of the barrel for the ejector?  I'm thinking a long end mill in the lathe and a half round block to keep it stable.

Will
Buzzards gotta eat, same as worms

Offline Ottawa Creek Bill

  • Vietnam Vet 1966,67 First place, Southeast Asia Rifle Team, "66/67"
  • Top Active Citizen
  • *
  • Posts: 1970
  • OCB, A Newer, More Gentler NCOWS Member...........
  • Liked:
  • Likes Given: 0
Re: 1860 Richards Model 1 conversion update
« Reply #11 on: September 29, 2006, 01:36:33 PM »
Quote
Just out of curiosity, how did you mill the grove in the side of the barrel for the ejector?  I'm thinking a long end mill in the lathe and a half round block to keep it stable.

I have a mill so I just put the barrel in a machinist vise and mill the slot with the appropriate size end mill 3/16".  You could also do this with a key way cutter. That would give a flat cut at the end of the slot instead of the round radius of the end mill. I think this is how I am going to cut the next one I do. It also has a groove milled just above it to hold the tube of the ejector rod housing. This is done witha 5/16" round end mill.

Bill
Vice Chairman American Indian Council of Indianapolis
Vice Chairman Inter tribal Council of Indiana
Member, Ottawa-Chippewa Band of Indians of Michigan
SASS # 2434
NCOWS # 2140
CMSA # 3119
NRA LIFER


Offline will52100

  • Top Active Citizen
  • *
  • Posts: 850
    • Custom Knives
  • Liked:
  • Likes Given: 3
Re: 1860 Richards Model 1 conversion update
« Reply #12 on: September 29, 2006, 01:57:46 PM »
Thanks, kind of what I figured.  I was thinking of a ball end mill to cut the grove for the housing, then clean up the end with a long end mill.
Buzzards gotta eat, same as worms

Offline Black River Smith

  • Top Active Citizen
  • *
  • Posts: 1188
  • Liked:
  • Likes Given: 46
Re: 1860 Richards Model 1 conversion update
« Reply #13 on: September 29, 2006, 02:43:30 PM »
Will52100, let us know if the VTI RM cylinder works.  When I looked at that approach the numbers/measurements did not work.  I even had the cylinder on order and then cancelled because my friends RM cylinder would not match up.  What brand 60 are you starting with?

If it works I will substitute cylinder.  Right now I have an original looking early 1st Model cylinder.  That being, one with cylinders stops cut through.

Even if it ends up for blanks or just show it was worth the fun and challenge.
Black River Smith

Offline will52100

  • Top Active Citizen
  • *
  • Posts: 850
    • Custom Knives
  • Liked:
  • Likes Given: 3
Re: 1860 Richards Model 1 conversion update
« Reply #14 on: September 29, 2006, 07:44:44 PM »
Thanks, I'm planning on using a Uberti revolver, I emailed the folks at VTI and while they wouldn't recomend it(liability reasons, it is a black powder frame after all) they said that people had made them work.  They also suggested the RM breachplate, but I'm after the type 1.

There's no way to tell if it'll work till I get the cylinder and try it though.
Buzzards gotta eat, same as worms


SMF spam blocked by CleanTalk

© 1995 - 2023 CAScity.com