Author Topic: Cap Gun Primer: Correct Cone Length  (Read 49683 times)

Offline Mako

  • Shooter of the "holy Black", Frontier Gunfighter #1, STORM, Henry 1860
  • Top Active Citizen
  • *
  • Posts: 1786
  • Cowboying since the Mid-20th Century
  • Liked:
  • Likes Given: 8
Cap Gun Primer: Correct Cone Length
« on: December 21, 2010, 04:45:13 PM »
All:
This is in response to sincere individuals who post on this board seeking advice with of Cap and Ball revolvers.  I am beginning  a compilation of things I have been taught and developed through experimentation and experience over the years.  I would be remiss if I didn’t acknowledge the expertise of fellow cap gun pistoleros and aficionados on this forum, I won’t list them for fear I would slight someone by forgetting them.

I will be posting in segments.  This first submission will be about correct cone length and I will follow with a more in-depth look at the caps themselves.  I posted pictures and illustrations on an earlier thread, much of that was ad hoc and on the fly so I will make a more workman attempt and clean up what I have shown.  Please note I may modify these posts as I find errors in typing or need to further expand a remark.

Please don’t reuse the illustrations without my explicit written consent.  Just write me.

Regards,

Mako
“Self promoting”  Frontier Gunfighter  and shooter of Colt’s  pattern 1860s
A brace of 1860s, a Yellowboy Saddle Rifle and a '78 Pattern Colt Scattergun
MCA, MCIA, MOAA, MCL, SMAS, ASME, SAME, BMES

Offline Mako

  • Shooter of the "holy Black", Frontier Gunfighter #1, STORM, Henry 1860
  • Top Active Citizen
  • *
  • Posts: 1786
  • Cowboying since the Mid-20th Century
  • Liked:
  • Likes Given: 8
Re: Cap Gun Primer: Correct Cone Length
« Reply #1 on: December 21, 2010, 04:50:29 PM »
The first thing that shooters have to realize about unmodified Colt and Remington pattern cap pistols is that the cylinder gap is relatively uncontrolled as compared to modern revolvers or the Colt revolvers after 1871.  I am speaking in generalities because there were some designs that addressed this situation, but that is not the subject of this discourse.  The advent of the “gas ring” (gas shield) at the front of the cylinder changed the nature of head spacing and cylinder gap.  Before this device the end shake of the cylinder literally allowed the gap to change from zero to whatever we normally describe as the working cylinder gap.  

You will see some of our board members like Flint and Pettifoger modifying cap pistols with the addition of a gas ring , if you pursue those modifications the following techniques should apply, but they need to be reviewed accordingly.

Note that there is basically no difference in the way you set up any of the Colt's pattern cap guns.  In fact the Army and Navy models share a common frame geometry.  There are differences, but the primary difference is the relief cut on the Army frame to facilitate the larger diameter forward portion of the cylinder.  The cylinder lengths change, but the relationships between the relevant components remains the same.  So anything from a Paterson to an 1862 reproduction can apply these concepts.  The same is true with the Remington reproductions, it is the relative positions of each of the components that determines the viability of the set up.

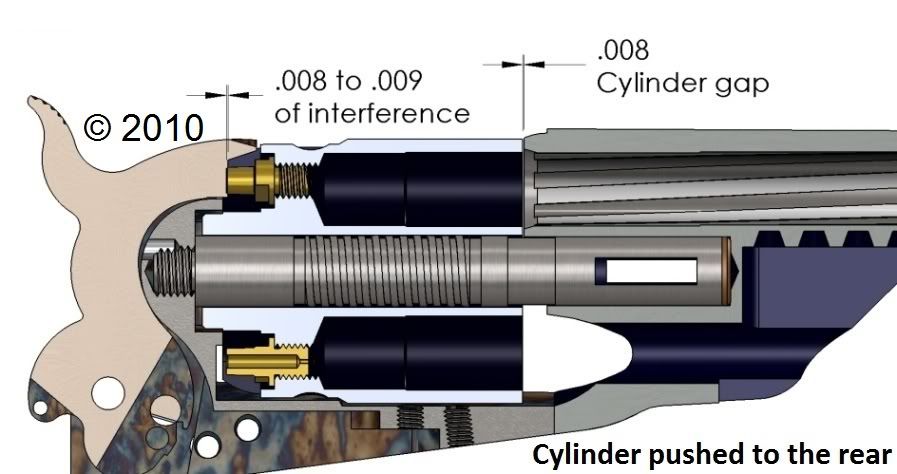
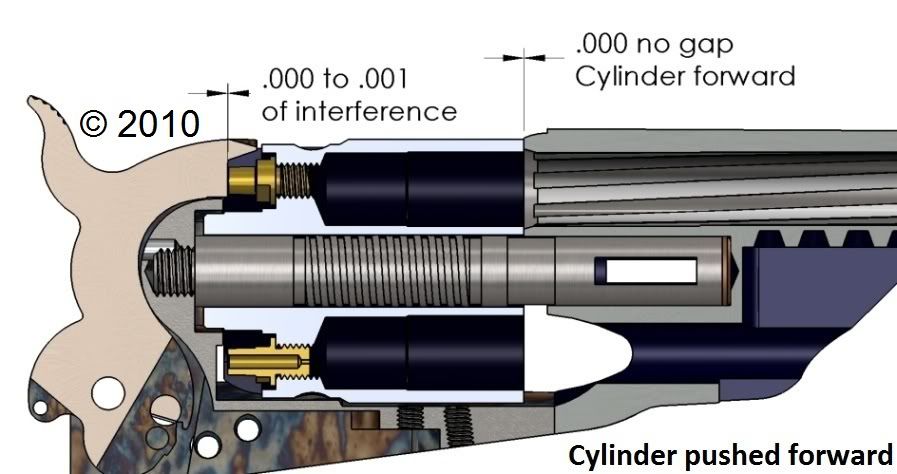
I personally run my cap guns with .008” to .009” of cylinder gap when the cylinder is pushed to the rear.  I run my  cartridge guns closer.  Others may have valid arguments for running them at some other number, but I find .008” works very well on a Colt’s pattern pistol.  I have less experience with Remington pattern pistols, but run them at .008” as well.

In this post I will illustrate the cones, cylinders, hammers and the barrel face to acquaint everyone with my terminology, the relative positions and the dimensions I will be speaking about.  In following posts I will expand on the explanations and later address how to get your pistol properly set up as shown.

The first two images below show the relative positions of the cones, cylinder, hammer face and the barrel face.  Note I am using Treso cones for my illustrations.  You can accomplish the same relationships with original or other aftermarket cones, but I find Treso cones to be extremely uniform and durable as well as aiding in the attenuation of back blast through the flash hole.  The Aluminum Bronze alloy is that Treso manufactures their cones from is one of the best if not the best choice possible for a wear resistant, flash hole erosion resisting, corrosion resistant material available.  As the measurement from 2 pairs of heavily used competition pistols attest, the cones hold their dimensions and form over the long haul.  The cones on my pistols are frequently removed and rigorously cleaned with little change dimensionally.


~Mako
A brace of 1860s, a Yellowboy Saddle Rifle and a '78 Pattern Colt Scattergun
MCA, MCIA, MOAA, MCL, SMAS, ASME, SAME, BMES

Offline Mako

  • Shooter of the "holy Black", Frontier Gunfighter #1, STORM, Henry 1860
  • Top Active Citizen
  • *
  • Posts: 1786
  • Cowboying since the Mid-20th Century
  • Liked:
  • Likes Given: 8
Re: Cap Gun Primer: Correct Cone Length
« Reply #2 on: December 21, 2010, 04:52:26 PM »
Additional Images to go with the previous text.  The headings should be self explanatory.

The hammer is shown overlapping the cone on the models.  This of course won't happen in reality, they are shown in this orientation for illustration purposes.

~Mako


A brace of 1860s, a Yellowboy Saddle Rifle and a '78 Pattern Colt Scattergun
MCA, MCIA, MOAA, MCL, SMAS, ASME, SAME, BMES

Advertising

  • Guest
Re: Cap Gun Primer: Correct Cone Length
« Reply #3 on: Today at 10:49:33 AM »

Offline Mako

  • Shooter of the "holy Black", Frontier Gunfighter #1, STORM, Henry 1860
  • Top Active Citizen
  • *
  • Posts: 1786
  • Cowboying since the Mid-20th Century
  • Liked:
  • Likes Given: 8
Re: Cap Gun Primer: Correct Cone Length
« Reply #3 on: December 21, 2010, 04:54:26 PM »
Here are a few more close ups showing both the relationship between the hammer face/cone and the cylinder/barrel face in the same view.

~Mako


A brace of 1860s, a Yellowboy Saddle Rifle and a '78 Pattern Colt Scattergun
MCA, MCIA, MOAA, MCL, SMAS, ASME, SAME, BMES

Offline Mako

  • Shooter of the "holy Black", Frontier Gunfighter #1, STORM, Henry 1860
  • Top Active Citizen
  • *
  • Posts: 1786
  • Cowboying since the Mid-20th Century
  • Liked:
  • Likes Given: 8
Re: Cap Gun Primer: Correct Cone Length
« Reply #4 on: December 21, 2010, 05:06:00 PM »
Now for views with caps on the cones...

All illustrations show Remington #10 caps on properly fit Treso cones.

Note the priming compound the bursting disk ("paper" in the cap in the case of the Remington) and the copper cup on the Remington caps add about .037" to .040" of height to the top of the cone.  even with this additional height it has been my experience and probably the experience of most seasoned C&B shooters reading this that it is not enough to just have the cap sit proud, you need to have it at this height with Remington caps for reliability.  Different brands will have different heights because of the priming compound thickness and the covering disk and sealant.  RWS and CCI both sit higher above the cone face because of their increased priming compound.

~Mako


A brace of 1860s, a Yellowboy Saddle Rifle and a '78 Pattern Colt Scattergun
MCA, MCIA, MOAA, MCL, SMAS, ASME, SAME, BMES

Offline Mako

  • Shooter of the "holy Black", Frontier Gunfighter #1, STORM, Henry 1860
  • Top Active Citizen
  • *
  • Posts: 1786
  • Cowboying since the Mid-20th Century
  • Liked:
  • Likes Given: 8
Re: Cap Gun Primer: Correct Cone Length
« Reply #5 on: December 21, 2010, 05:20:04 PM »
These are some illustrations of caps on a Uberti 1860,  The models were generated from basic reverse engineering.  All computer models were generated from dimensions of the subject pistols.  The models are thorough and accurate representations from dimensions taken from a population of 6 pistols.

One new in the box Uberti 1860 of manufacture some time before 2007 was used as the primary base pistol, the mate (also unfired) to that pistol was used as a second measurement for some critical dimensions.

Measurements of setup cones and their relative positions were taken on two more working pairs of Uberti 1860s.  One set is pre 2002 and the second is pre 2005.  In addition an 1860 Colt produced in 1861 was used as a control for general positions and overall look, all of the Italian pistols have taken liberties or departed from the original on some features.  The Colt acts as a control. The dimensions were averaged for the purposes of this exercise.  Note that all of the 4 working pistols used for the cone measurements all had cylinder gaps between .008" and .009", the gaps were measured with feeler gages.  All 4 pistols had maximum hammer to cone interference of of .007" to .012".  The minimum on any pistol was a gap determined to be .002" by extrapolating dimension from the hammer face and the cone height.  These pistols have seen quite a few seasons and have held up well.  It is much less likely that the cone to hammer face distance for six cones per pistol will be identical than the likelihood the cylinder gap will be similar with groups of pistols.  Overall the average ran .009" for cylinder gap and .008" for the hammer to cone interference (with the cylinder to the rear).

Just for grins I measured the cylinder gaps on the NIB 1860s and they were .006" and .004" with a definite out of parallel gap between the cylinder and the barrel. These haven't been corrected on the arbor-to-barrel-to-wedge relationship.

Since I was on a roll I also measured an unfired pair of Pietta 5 1/2" barreled 1860s, one cylinder gap ran .012" and the other right at .008".  The cylinder gaps were much more parallel in relationship.  The arbor bottomed out on the one that measured .012" , a slight gap was evident at the barrel to frame interface.  This barrel is definitely bottoming out on the arbor and should be easy to correctly set up.

When viewing the illustrations note the relative positions of the caps, their relationship to the recoil shield and also the clearances.

~Mako


A brace of 1860s, a Yellowboy Saddle Rifle and a '78 Pattern Colt Scattergun
MCA, MCIA, MOAA, MCL, SMAS, ASME, SAME, BMES

Offline Mako

  • Shooter of the "holy Black", Frontier Gunfighter #1, STORM, Henry 1860
  • Top Active Citizen
  • *
  • Posts: 1786
  • Cowboying since the Mid-20th Century
  • Liked:
  • Likes Given: 8
Re: Cap Gun Primer: Correct Cone Length
« Reply #6 on: December 21, 2010, 05:54:12 PM »
These illustrations show the overall shape caused by the forming operation of the Remington cap from the flat blank.  Remington leaves their formed cap cups untrimmed, I have also included the illustration of  CCI #11 and RWS 1075 caps which have their edges trimmed after the cups has been drawn.

Note how the Remington caps have four "petals,"  this is often the exact shape the fired cap will take.  In a future post I will provide photographs of the forming "cracks" where the petals come together on the Remington caps.  While not as apparent, there are stress cracks which are much harder to see on the CCI and RWS cups.  Since these two companies trim their formed cups they end up removing the forming crack or seam that remains in the crotch of the Remington caps.


The ribbing on the outside of the CCI caps carries through the material and shows up on the inside of the cup.  I will show this ribbed feature carry through on some later microscopy images.  The ribbing on the RWS cups shows as a ghost image on the I.D. just like the Remington caps, it is basically unmeasurable.  The CCI bottom edge is "square," The RWS has a "saw tooth" edge because there is an internal chamfer which creates the effect.


~Mako
A brace of 1860s, a Yellowboy Saddle Rifle and a '78 Pattern Colt Scattergun
MCA, MCIA, MOAA, MCL, SMAS, ASME, SAME, BMES

Offline hellgate

  • Top Active Citizen
  • *
  • Posts: 1685
  • Liked:
  • Likes Given: 0
Re: Cap Gun Primer: Correct Cone Length
« Reply #7 on: December 21, 2010, 10:54:27 PM »
Your mastery of the illustrative art is enviable. Many of us have intimate knowledge of our well used guns  but few can put it into a cohesive and clear presentation. I eagerly anticipate further installments and possibly a contribution or two of my own experience. I am unable to figure out how to take pictures and display them to others let alone do CGI. I stand in awe. In other words, "Rat own brutha!"
"Frontiersman: the only category where you can shoot your wad and play with your balls while tweeking the nipples on a pair of 44s." Canada Bill

Since I have 14+ guns, I've been called the Imelda Marcos of Cap&Ball. Now, that's a COMPLIMENT!

SASS#3302L
REGULATOR
RUCAS#58
Wolverton Mt. Peacekeepers
SCORRS
DGB#29
NRA Life
CASer since 1992

Offline Fox Creek Kid

  • Top Active Citizen
  • *
  • Posts: 4558
  • Liked:
  • Likes Given: 108
Re: Cap Gun Primer: Correct Cone Length
« Reply #8 on: December 24, 2010, 05:39:23 PM »
I think where he is going is to show that the nipple/cap/hammer relationship is the soul of of a cap 'n ball revolver and once this is solved then 95% of the battle is won. The rest being a good action, a good load & finally sights well regulated to POA. It is then that the shooter will know the true joy that a cap 'n ball revolver can be.  Mako, your graphics are simply stunning.  ;)

Offline Crow Choker

  • Top Active Citizen
  • *
  • Posts: 1106
  • River Banker Extraordinaire
  • Liked:
  • Likes Given: 36
Re: Cap Gun Primer: Correct Cone Length
« Reply #9 on: December 27, 2010, 03:40:11 PM »
Hey Mako, Good Day to Ya. Don't know where you were for so long, not needed information, but glad to have ya back. Thanks much for the info and pictures you've posted on this topic and the ones on another subject in the 'Darksider Den' re: 'Capin' Ball Capping Questions', replies 30&32. Also recently in the STORM section ref 44 caliber vs 45 colt rims, cylinders, etc. Very usefull and interesting info there, never seen some of that in 38 years of shooting cap an balls and reading about it. Not a fananic fan of the Batman movies made in the last 20 or so years, although I've seen them all. In one of the early ones the Joker who has been outdone by some of Batmans high tech weapons and gizmo's states "Where does he get all of those wonderfull toys". Thats what I wonder when you post all of the 'wonderfull' pictures, cross sections, etc of nipples, guns, etc. Thanks much, keep em coming. Yers, Crow Choker  
Darksider-1911 Shooter-BOLD Chambers-RATS-SCORRS-STORM-1860 Henry(1866)-Colt Handgun Lover an' Fan-NRA-"RiverRat"-Conservative American Patriot and Former Keeper & Enforcer of the Law an' Proud of Being Both! >oo

Offline Mako

  • Shooter of the "holy Black", Frontier Gunfighter #1, STORM, Henry 1860
  • Top Active Citizen
  • *
  • Posts: 1786
  • Cowboying since the Mid-20th Century
  • Liked:
  • Likes Given: 8
Re: Cap Gun Primer: Correct Cone Length
« Reply #10 on: December 27, 2010, 10:46:35 PM »
Hey Mako, Good Day to Ya. Don't know where you where for so long, not needed information, but glad to have ya back…  

Hey Crow Choker,

I was out looking for Bruce of course...

As far as the toys go, just like the Batman, I make them.  The reason I started the models was for exactly the reason you stated.  I’ve never seen anything like them either.  We have some wonderful information from people like Mr. Larson E. Pettifogger with some very good pictures.  But, I think that having detailed solid CAD models  will help answer questions like Aggie Desperado posed.

You can thank Flint for getting me thinking about it.  He had modeled some Navy parts to help him with his conversions and the aftermarket cylinder hands he makes.  It just sort of happened after Aggie asked his question and I realized there wasn’t any good material out there to illustrate the relationships.  Then yesterday it just took a few minutes to modify a cylinder I already had as a model and then make a couple of cartridges to show the problems with rim size you saw on the STORM forum.  Once you have done the hard work it literally takes minutes to modify it as I did.  It becomes a method to demonstrate what I and others have learned from experience and experimentation.

I need to continue on with what I started, I’ll get back to it this week.  I’m not attempting to retell what is already available, but to add to where the information is lacking.

Regards,
Mako
A brace of 1860s, a Yellowboy Saddle Rifle and a '78 Pattern Colt Scattergun
MCA, MCIA, MOAA, MCL, SMAS, ASME, SAME, BMES

Offline Mako

  • Shooter of the "holy Black", Frontier Gunfighter #1, STORM, Henry 1860
  • Top Active Citizen
  • *
  • Posts: 1786
  • Cowboying since the Mid-20th Century
  • Liked:
  • Likes Given: 8
Re: Cap Gun Primer: Correct Cone Length
« Reply #11 on: January 03, 2011, 07:14:16 PM »
All:
Some microscopy images of Remington and CCI caps.

First I will show the Remington #10 and the CCI #10.  Note the petals that appear in the CAD models of the Remington caps.

~Mako


A brace of 1860s, a Yellowboy Saddle Rifle and a '78 Pattern Colt Scattergun
MCA, MCIA, MOAA, MCL, SMAS, ASME, SAME, BMES

Offline Mako

  • Shooter of the "holy Black", Frontier Gunfighter #1, STORM, Henry 1860
  • Top Active Citizen
  • *
  • Posts: 1786
  • Cowboying since the Mid-20th Century
  • Liked:
  • Likes Given: 8
Re: Cap Gun Primer: Correct Cone Length
« Reply #12 on: January 03, 2011, 07:21:43 PM »
Now the Rem #11 and the CCI #11...


A brace of 1860s, a Yellowboy Saddle Rifle and a '78 Pattern Colt Scattergun
MCA, MCIA, MOAA, MCL, SMAS, ASME, SAME, BMES

Offline Mako

  • Shooter of the "holy Black", Frontier Gunfighter #1, STORM, Henry 1860
  • Top Active Citizen
  • *
  • Posts: 1786
  • Cowboying since the Mid-20th Century
  • Liked:
  • Likes Given: 8
Re: Cap Gun Primer: Correct Cone Length
« Reply #13 on: January 03, 2011, 07:34:14 PM »
This is the fold seam ("split") that appears at the petal crotch on many of the Remington caps.  Please note it usually appears on on the inside and outside, from this we know it passes entirely through the cup. Some splits only show on the inside and either do not pass through, or more likely have been smeared over by the corrugation operation.

Look at the interior of the Remington Caps.  You can see the superficial marking made by the roll tool that made the corrugations, and notice the relatively smooth walls.  As you can see, the burnished inner walls are smooth enough to show reflections.

~Mako


A brace of 1860s, a Yellowboy Saddle Rifle and a '78 Pattern Colt Scattergun
MCA, MCIA, MOAA, MCL, SMAS, ASME, SAME, BMES

Offline Mako

  • Shooter of the "holy Black", Frontier Gunfighter #1, STORM, Henry 1860
  • Top Active Citizen
  • *
  • Posts: 1786
  • Cowboying since the Mid-20th Century
  • Liked:
  • Likes Given: 8
Re: Cap Gun Primer: Correct Cone Length
« Reply #14 on: January 03, 2011, 07:44:14 PM »
These are CCI # 10 caps.  Notice the corrugations show through but are very shallow making them un-measurable without using an optical  measuring system.  To help you get a concept of scale and relative comparison in size of the ribs, the measured cup thickness is .008"

~Mako


A brace of 1860s, a Yellowboy Saddle Rifle and a '78 Pattern Colt Scattergun
MCA, MCIA, MOAA, MCL, SMAS, ASME, SAME, BMES

Offline Mako

  • Shooter of the "holy Black", Frontier Gunfighter #1, STORM, Henry 1860
  • Top Active Citizen
  • *
  • Posts: 1786
  • Cowboying since the Mid-20th Century
  • Liked:
  • Likes Given: 8
Re: Cap Gun Primer: Correct Cone Length
« Reply #15 on: January 03, 2011, 08:10:46 PM »
And these are the interiors and bottom edges of the CCI #11 caps.  You can tell the 10s from the 11s by the bursting disk color.  The material covering the priming compound does not appear to be a paper disk as you find in the Remingtons and RWS caps.  looking at it through the sealer it  appears to be more of a polymer or glue based composite.  Perhaps it is mixture with polymer or cellulose fibers, in reality a lot of a the products we call "paper" or "cardboard" are in fact synthetic composites.  There is also an overcoat of material  to seal it in protect the priming compound.  You can see it on the interior walls of the second image.

The serrations are a bit deeper on the #11 caps.  The resulting edge is part of the O.D. corrugation forming process.  The edges were most probably square and perpendicular to the axis of the cap until the corrugation operation deformed the material and makes the edge ridged.  If you look at the side views of the CCI caps in previous posts you can see the external edge break (radius) created by the the form tooling.  The undulations of the edge is only apparent when looking at the edge at an oblique orientation.

~Mako


A brace of 1860s, a Yellowboy Saddle Rifle and a '78 Pattern Colt Scattergun
MCA, MCIA, MOAA, MCL, SMAS, ASME, SAME, BMES

Offline Mako

  • Shooter of the "holy Black", Frontier Gunfighter #1, STORM, Henry 1860
  • Top Active Citizen
  • *
  • Posts: 1786
  • Cowboying since the Mid-20th Century
  • Liked:
  • Likes Given: 8
Re: Cap Gun Primer: Correct Cone Length
« Reply #16 on: January 04, 2011, 05:37:09 PM »
Here is the RWS 1075 cap.  It appears to have a paper cover on the priming compound and is then sealed to keep the paper in place and protect the compound from moisture.

As you can see the interior walls are smooth and there is a lead chamfer on the inside edge.  The corrugations stop short of running to the top of the cap which gives it a slight "mushroom" head.  

The edges which were probably cut square after the cup drawing operation are now ridged as a result of the O.D. rib forming process and the I.D. chamfer.  Unlike the CCI caps the edge of the RWS caps have a "saw tooth" appearance.  Looking at the CCI caps from the side you can see an external edge break added by the tooling.  Now look at the oblique view of the RWS cap and you will see an internal chamfer on the edge.  This feature is large enough that it creates the saw tooth effect when meeting the rib depressions.

This is purely conjecture, but the mushroom shape of the head may be to facilitate the thick priming compound of the RWS caps.   Stopping the corrugation short of the top creates a neck.  It may aid in uniform dispensing of the priming compound or to allow the paper disk on top of the compound to get a mechanical grip in the undercut.  This can potentially aid in keeping the compound in place and sealed.

Regards,
Mako


A brace of 1860s, a Yellowboy Saddle Rifle and a '78 Pattern Colt Scattergun
MCA, MCIA, MOAA, MCL, SMAS, ASME, SAME, BMES

Offline john boy

  • Top Active Citizen
  • *
  • Posts: 1488
  • Liked:
  • Likes Given: 0
Re: Cap Gun Primer: Correct Cone Length
« Reply #17 on: January 05, 2011, 10:14:08 PM »
Mako, I've been trolling this thread.  Just want to say Thanks!  Great information and really learned a lot
Regards
SHOTS Master John Boy

WartHog ...
Brevet 1st Lt, Scout Company, Department of the Atlantic
SASS  ~  SCORRS ~ OGB with Star

Devote Convert to BPCR

Offline Kent Shootwell

  • Top Active Citizen
  • *
  • Posts: 780
  • Got whiskey, will stumble.
  • Liked:
  • Likes Given: 22
Re: Cap Gun Primer: Correct Cone Length
« Reply #18 on: January 17, 2011, 06:54:50 PM »
You've changed my whole out look on engineers! Dandy work, thank you!
Little powder much lead shoots far kills dead.
Member, whiskey livers
AKA Phil Coffins, AKA Oliver Sudden

Offline Smokin Gun

  • "I Smoke Black Powder!"/ "Prefer an 1858 Remington"
  • Top Active Citizen
  • *
  • Posts: 219
  • Preferred Shootin' Iron 1858 Rem
    • Black Powder Revolver Forum
  • Liked:
  • Likes Given: 0
Re: Cap Gun Primer: Correct Cone Length
« Reply #19 on: January 19, 2011, 10:37:16 PM »
Mako good job and well done 8)
Mosby's Rangers
43rd Virginia Cavalry C.S.A.
SASS# 19634
http://blackpowdersmoke.com/oldcoots/index.php


SMF spam blocked by CleanTalk

© 1995 - 2023 CAScity.com