Enter your search terms
Submit search form
www.cascity.com
Web
Javascript DHTML Drop Down Menu Powered by dhtml-menu-builder.com
Welcome,
Guest
. Please
login
or
register
.
Did you miss your
activation email?
March 20, 2010, 04:17:14 am
1 Hour
1 Day
1 Week
1 Month
Forever
Login with username, password and session length
Search:
Advanced search
Currently there are
0 Users in the Cas City Chat Rooms!
Cas City Forum Hall & CAS-L
|
CAS TOPICS
|
Gunsmithing
| Topic:
Antiquing "How-To"
0 Members and 2 Guests are viewing this topic.
« previous
next »
Pages:
1
2
3
4
5
[
6
]
Author
Topic: Antiquing "How-To" (Read 22042 times)
Virginia Gentleman
Top Active Citizen
Offline
Posts: 817
Here's a McRib for Allah
Re: Antiquing "How-To"
«
Reply #50 on:
January 25, 2008, 10:18:23 am »
How do you make holster wear? Make lots of passes through the holster until the metal starts showing?
Report to moderator
Logged
See my ads in Cas City Classifieds
Marshal Will Wingam
Garden Variety
Deputy Marshal
Top Active Citizen
Offline
Posts: 8497
Smile. It makes people wonder what you're up to.
Re: Antiquing "How-To"
«
Reply #51 on:
January 25, 2008, 12:00:29 pm »
That is one way to do it but I think you'd loose interest after a while. You could put jeweler's rouge or polishing compound on a piece of leather and rub the high points until it shows the same amount of wear you would find on an old pistol. A couple photos of old guns would let you know where to do this to really look authentic. A little care would produce a good result. If you have a holster you don't want to use again, you could put the polishing compound all over the inside and start in but that would still be doing things the hard way.
Report to moderator
Logged
SCORRS SASS BHR
Delgado
Citizen
Offline
Posts: 10
Re: Antiquing "How-To"
«
Reply #52 on:
February 02, 2008, 05:54:20 pm »
Great idea Marshal. The cheapest and ugliest holster will be transformed into very special tool.
But please donīt try this job with the cylinder in only one position, unless you want a very funny wearing pattern.
Delgado
Report to moderator
Logged
Daniel Nighteyes
SASS #64931, W3G charter member, SCORRS, SoBAD #1, IRP #6, SUDDS #181, STORM #266, Long Lox Regulators (and a Warthog to boot...)
Top Active Citizen
Offline
Posts: 1045
Just an Indian outlaw, not Cherokee but Choctaw...
Re: Antiquing "How-To"
«
Reply #53 on:
February 28, 2009, 11:46:08 am »
I've posted these pics on SCORRS, and thought they might also be appropriate here. I started with a pair of Uberti New Model Armies with that butt-ugly Millennium finish. I dissassembled them, then degreased thoroughly with brake cleaner. I removed the finish by soaking them in white vinegar and wiping off with a series of paper towels. By the way, I discovered that part of the Millennium finishing process involved bead-blasting the metal. Next came a thorough soaking in a baking-soda/water solution, and an even more thorough rinsing under running tap water.
The
moment
they hit the air, they started oxidizing, so I rubbed them down really well with lots of oil. I thoroughly swabbed out and oiled the bores too.
Next came the fun part -- using and shooting them in matches and, with reasonable care, letting them age on their own. Several times I've been asked if they're originals, which pleases me greatly.
Here's how they looked shortly after I finished them, but before installing "aged ivory" grips and the "antique finish" R&D conversion cylinders. Note that I did not strip the finish from the percussion cylinders:
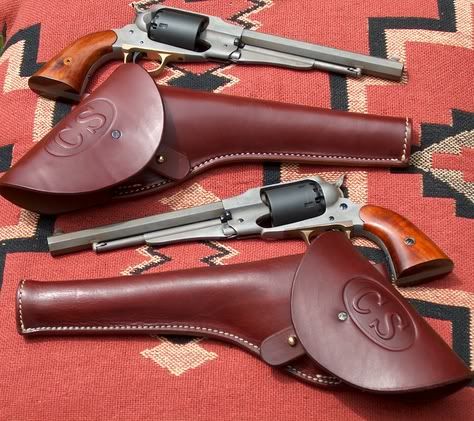
Here's how they looked with the new grips/cylinders and a few months of handling and use:
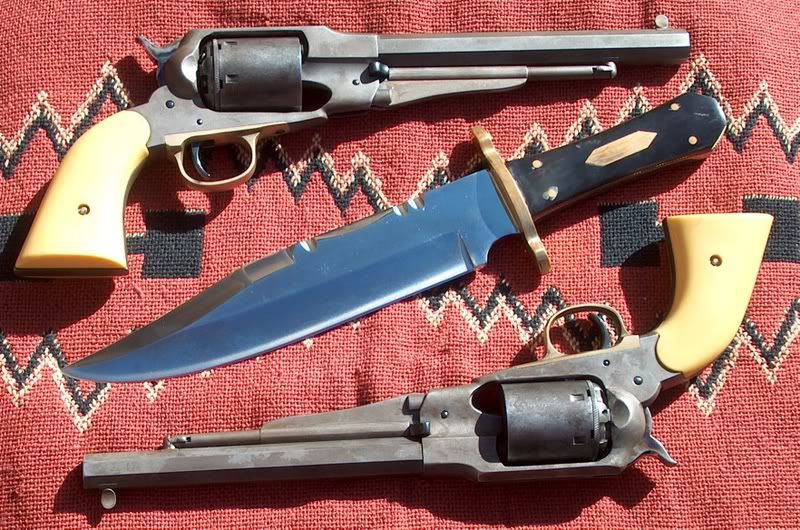
And here's how they look today, after better than a year of handling and use:
Report to moderator
Logged
"It makes my heart sick when I remember all the good words and the broken promises."
-- Chief Joseph, 1877
Jubel
Top Active Citizen
Offline
Posts: 141
Re: Antiquing "How-To"
«
Reply #54 on:
March 09, 2009, 10:24:22 pm »
Well here's my nickels worth, I purchased a Richards Mason that came from the factory antiqued it was the only
one in 45 Schofield I could find locally. It had the standard 8" 1/2 bbl. I purchased a 5 1/2 BBL from Cimarron and I
followed the directions for antiquing using white vinagar until I matched the new BBL to the rest of the revolver. I
then used the polimar gun cleaner and protectant by Sweet Shooter as directed and so far rap on wood, no rust or
discoloration. This was two (2) years and many rounds ago.
Report to moderator
Logged
Cousin we been ashooten at each other all day! How about we stop for a beer then we kin go home and get our axes. Or just as good, lets forget this whole dang feud, I'm agetten too old for this anyhow!
IE300
Citizen
Offline
Posts: 5
Re: Antiquing "How-To"
«
Reply #55 on:
May 01, 2009, 10:15:10 pm »
Here's my Pietta Remington 1858 nice and pretty from the factory.
1858BEFORE.jpg
(26.02 KB, 640x480 - viewed 123 times.)
Report to moderator
Logged
IE300
Citizen
Offline
Posts: 5
Re: Antiquing "How-To"
«
Reply #56 on:
May 01, 2009, 10:28:15 pm »
Here's my Pietta Remington 1858 after I destroyed it. Well, I'm not quite finished destroying it yet, I have a few more adjustments to make before I head into the sunset. Or maybe I'll just let time and wear take it from here.
I won't detail my metal finishing here. Suffice it to say that I did a bunch of experimentation, and ended up doing some variations on what you read about other peoples techniques on this site. It was all fun.
I cut the barrel to 5.5", cut the loading lever to match (although it has no latch to keep it from flopping around, so I'll probably never use it. I sanded the grips and finished them using USMC leather die, worked great on the wood! The cylinder pin retaining block (that's what I'm calling it, anyway) I fabricated from a scrap drillbit and some 1/4" steel I had. I drilled and tapped it to accomodate the retaining screw with the knurled brass button shown in the photo detail. I silver soldered a piece of square steel to the bottom front of the cylinder pin, just to fill the small space below it which would have been exposed. This was just cosmetic, but I like the result. The brass trigger guard I gave a slight copper plating to using some old jewelers pickle. Copper ages faster than brass, so I figured I'd give it a try. I fabricated the 2 crosses for the handles from a little scrap sterling, and affixed them with JB Weld, after degreasing the handles. I buffed the handles with the crosses on a buffer, hit them both again with the dye and hand rubbed them. I'll be the first to admit that my gunsmithing is primitive, but this project came out about as I would have hoped for. I finished it with a holster kit I bought from Tandy Leather. Nothing fancy, but I wasn't going to put my creation in a holster I didnt at least put together myself. Unfortunately, now I got the bug and I'm afraid there will be more such projects in the near future.
THE CROSSES ARE A TRIBUTE TO CLINT EASTWOOD
THE NAME OF THIS PISTOL IS "THE PREACHER"
[/b]
1858FINAL 001.jpg
(14.91 KB, 576x432 - viewed 156 times.)
1858FINAL 003.jpg
(20.49 KB, 576x432 - viewed 106 times.)
1858FINAL 004.jpg
(15.32 KB, 576x432 - viewed 93 times.)
1858FINAL 002.jpg
(14.72 KB, 576x432 - viewed 112 times.)
Report to moderator
Logged
Curley Cole
Top Active Citizen
Online
Posts: 1280
Re: Antiquing "How-To"
«
Reply #57 on:
May 02, 2009, 01:18:36 am »
I got this Dakota years ago as a kit so it was in the "white", so I wanted to finish it to look well used. Well, that and using it for 25 some years has made it come true....
The gun in the book under my gun is Doc Hollidays and it looks very much similar...(pix doesn't do it justice.)
good shootin
curley
Report to moderator
Logged
Scars are tatoos with better stories.
The Cowboys
Silver Queen Mine Regulators
Curley Cole
Top Active Citizen
Online
Posts: 1280
Re: Antiquing "How-To"
«
Reply #58 on:
May 02, 2009, 01:21:30 am »
Sorry gang, didn't realize I had already posted to this thread....my apologiezs...
curley
Report to moderator
Logged
Scars are tatoos with better stories.
The Cowboys
Silver Queen Mine Regulators
Pages:
1
2
3
4
5
[
6
]
Cas City Forum Hall & CAS-L
|
CAS TOPICS
|
Gunsmithing
| Topic:
Antiquing "How-To"
« previous
next »
Jump to:
Please select a destination:
-----------------------------
Cas City
-----------------------------
=> Midway USA's Cowboys
=> Cas City - Site Support & Comments
=> Greetings!
-----------------------------
CAS TOPICS
-----------------------------
=> The Longbranch
=> Shooter's Meeting
=> CAS FAQ
=> The Leather Shop
=> Gun Reviews
=> CAS Events
=> The Darksider's Den
===> The Dark Arts
=> NCOWS
=> WESTERN 3 GUN
=> Gunsmithing
-----------------------------
Special Interests - Groups & Societies
-----------------------------
=> Cas City Historical Society
===> The Old Fashioned Way
=> The Cutting Edge
=> The Barracks
=> Cosie's Corner & Feed Bag
===> The Pantry
=> BOLD Chambers
=> RATS
=> Spencer Shooting Society
=> USFA CSS
=> SCORRS
=> STORM
=> Frontier Iron
=> BROW
===> The BROW Archive
=> 1860 Henry
=> The Winchester Model 1876
-----------------------------
Regional Topics
-----------------------------
=> Chinook Country
=> Kansas
=> Nebraska
=> CAStm down under
-----------------------------
GENERAL TOPICS
-----------------------------
=> The Shootin' Range
=> Constitutional rights (RKBA)
=> Tall Tales
=> Saddlebag Tales
===> ST Comments
=> Books & Movies
*
About CasCity.com
*
Contact us
*
Loading...